Overlay Issue
|
Hello,
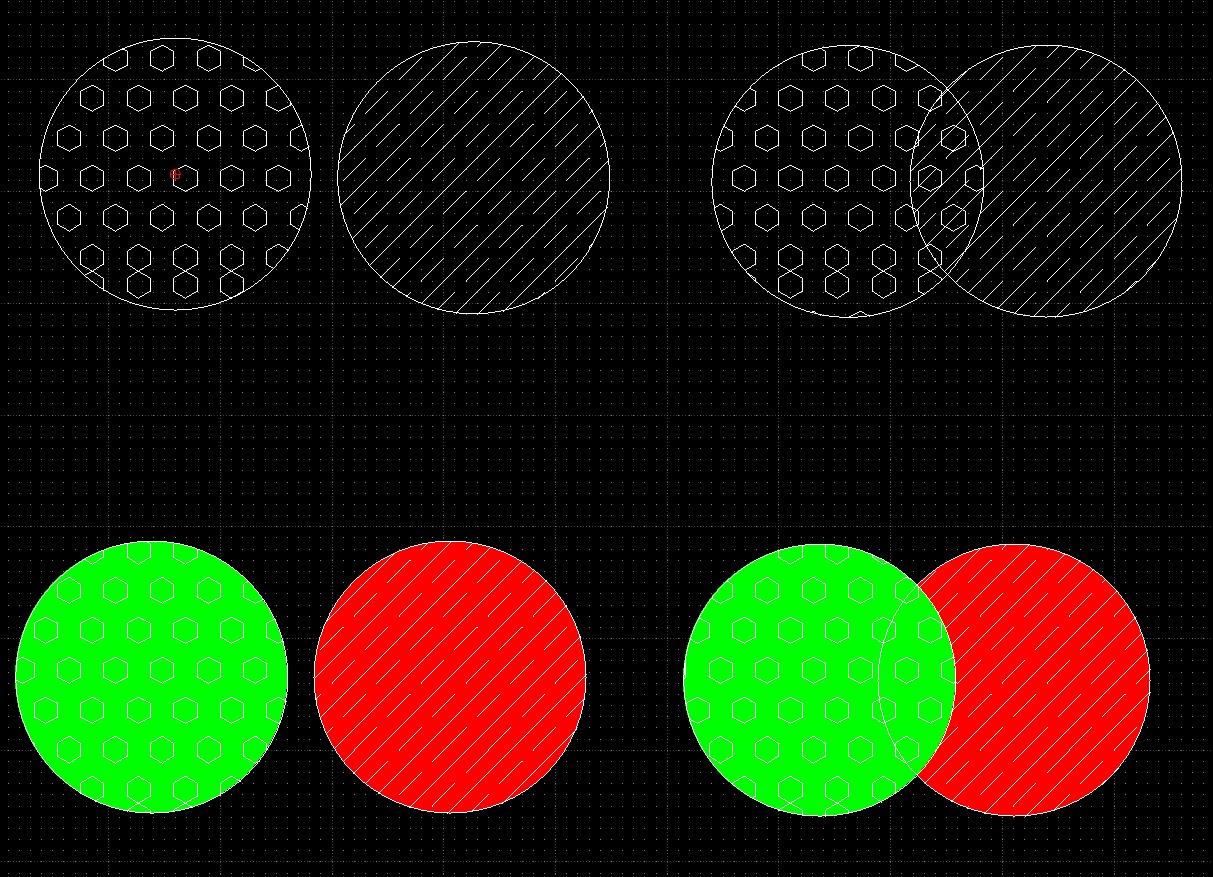
New user to LibreCAD and I love it. So far, I have figured most of the capabilities I need, but after searching numerous LibreCAD YouTube help videos, I am still stuck with a problem I cannot solve. I think my problem is related to technique/experience with LibreCAD but that is only my guess. In my test drawing I have two layers (0 and 1). Layer 0 has a circle and layer 1 has another circle. Both circles have a different hatch pattern. When I overlay circle 1 over circle 0, circle 1 (set to top) does not completely block the circle and hatch pattern underneath. At first, I assumed it was a simple matter of setting Z axis priority (i.e., bring to top, which I vaguely remember from using AutoCAD), but this did not work. Then it dawned on me that the “space” between the hatch lines is “nothing”, so when the circles overlap, both hatch patterns “merge”. So, next I created a hatch pattern in the circle that was a solid fill and set it to a color. Then I added a second hatch pattern into that circle. This seemed to solve the problem, but I prefer to not use any colors in my drawing. Can someone help me with a solution that does not use solid fill colors? Below is a link to my Overlay Test LibreCAD file on my share drive: https://1drv.ms/f/s!AhbLP5TvMQAu73Oc4p2G3nA53auQ?e=gU126K Below is a screenshot from my Overlay Test:  |
|
You may want to cut(Modify->Divide) the circles.
Like this you will have better control and hatch only the portions you need. HTH Pere |
|
This post was updated on .
Thank you very much for your kind suggestion, but unfortunately, I don't believe that will work. I was just using the circles as a basic example.
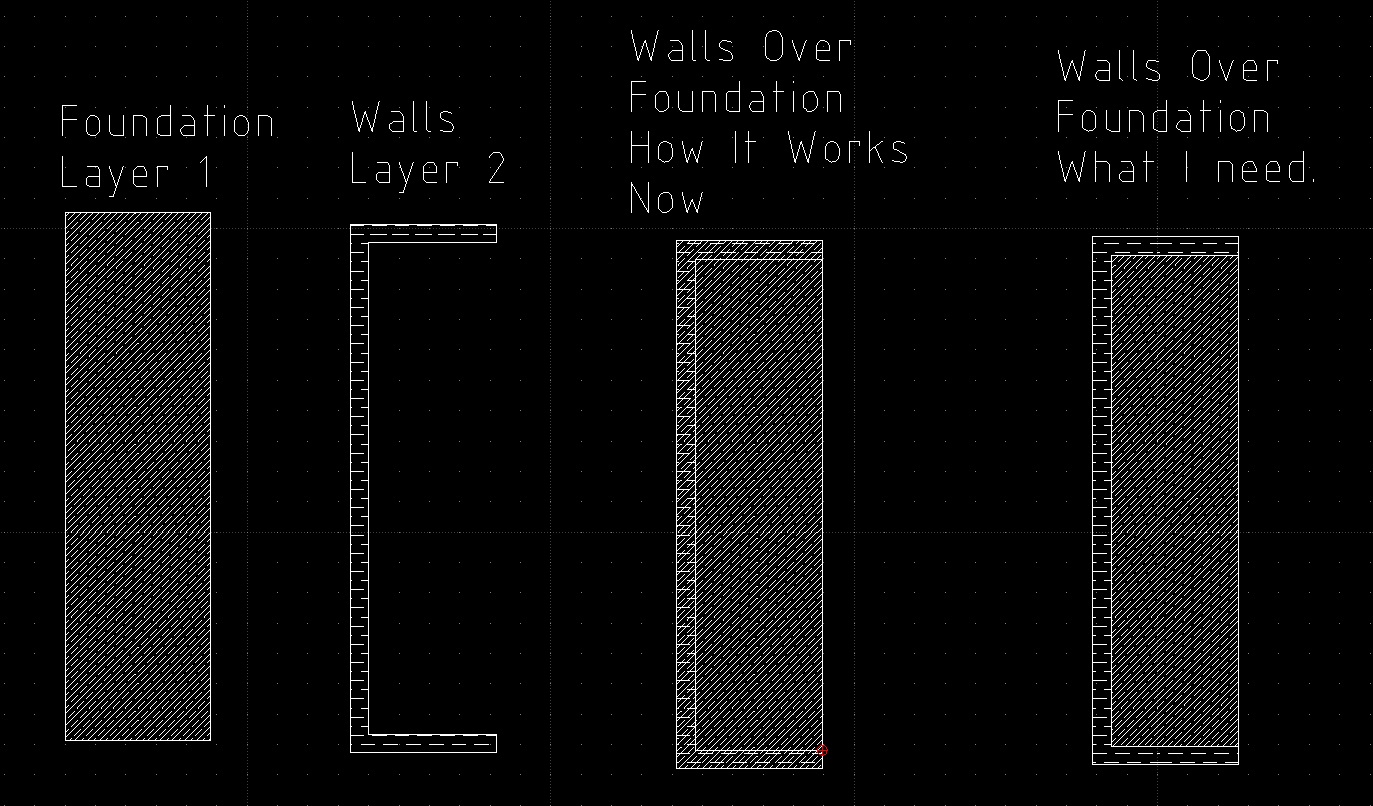
In AudoCAD, from what I think I remember (sorry, long time ago), a layer with a hatch pattern placed over another layer with its own hatch pattern, completely covers the hatch pattern below. Here is a better example below of what I am trying to do versus the circles. When I lay the walls over the foundation, I need the hatch pattern of the walls (layer 2) to completely "cover" the hatch pattern of the foundation (layer 1). For construction plans I need to print various versions of different layers and I don't want to trim the foundation hatch pattern under the walls because if I later turn off the walls (layer 2) then the hatch pattern of the foundation does not cover the full foundation. I will say that I realize I could create another layer of the foundation hatch pattern trimmed under the walls and turn that on/off as needed, but I was hoping the experts in LibreCAD had a more elegant solution. 
|
|
Instead of a colorful solid hatch, you could use a nearly white solid hatch to cover the other hatching, just one rgb value off. It can not be noticed. If you use a pure white it will print black.
|
|
As LC is now, I imagine that is the only way, maybe there is place for an improvement?
Making hatches to hide what is under them (configurable? allways?) will really be usefull in the usecase that is presented here. BTW, I get a crash when trying to zoom with the mouse wheel in the Hatch preview window inside the Hatch dialog. (commit bbb42b87ba390456aaf8dc28ce213987f53bce54 self compiled today) Does it happens to more people? Pere |
|
This post was updated on .
Fixed
|
|
In reply to this post by perepujal
Currently, hatch is either curves only or solid fills.
Lots of work is needed to add features like this, also to improve the current algorithm correctness and efficiency.
|
|
Today I have discovered a bug concerning solid fills in 2.2.1-450 and earlier.
For experiments I had added a covering mask on an existing sample drawing in 2.2.0. When opening the file in 2.2.1-450, activating the mask layer all is right, but when going into Print Preview some of the to be covered elements shine through. Not so in 2.2.0. arch_cm_100_a4_uebung_220.dxf There is missing image connected to the file, not necessary to see the effect . |
|
In reply to this post by dxli
For your entertainment: I have tried to edit an existing hatch file, ansi31, and put a near_white solid fill into the background, saved as ansi31_white. But when used, the white didn't show up.
As an alternative way I have used a 1-pixel white png image as background. Didn't work either. |
|
Could you create an issue at github with clear steps to reproduce this issue?
Hatch implementation is not well-structured, so there's probably no quite fixes.
|
|
In reply to this post by dellus
Good discussion, thank you for the opinions/suggestions.
As dxli posted, it would be a bit of work to address this hatch issue/feature discussed. I understand this because I started my career as a professional software engineer many years ago. It's not as simple as filling in "black" between hatch lines/curves. For example, hatch lines/curves show up as white on a computer screen but black on a printed drawing (let's ignore colors for now). So, the so-called "fill" between hatch lines/curves would need to show up as "black" on a screen, blocking hatch pattern(s) underneath, but when you print a drawing, that same "fill" would need to show up as "no ink" on the paper, while still blocking hatch pattern(s) underneath. It would be a cool feature but a bit involved to implement. If the developers do decide to add this feature to the list of improvements, I suggest adding a check box (on/off toggle) to the selected Hatch (on that setting screen where you check the box for solid hatch) allowing a user to toggle overlaying a Hatch pattern over (covering) Hatch pattern(s) underneath but a setting that is specific an individual Hatch pattern (not a system wide setting). |
«
Return to LibreCAD-user
|
1 view|%1 views
| Free forum by Nabble | Edit this page |

