Apprentissage
12
12
|
Bonjour,
Dans la cotation d'une faible épaisseur de la pièce à usiner d'une ligne de cote avec les flèche inversée. Je n'ai pas trouvé dans le logiciel, la manière de procéder alors, à l'écart de mon plan, j'ai tracé les flèches dont j'ai besoin, puis copié à l'endroit voulu. Le procédé et un peu long. Votre avis sur ce sujet? Celmar |
|
Comment faire pour couper une ligne en deux?
Je trace une ligne droite horizontale. Je trace deux lignes droite perpendiculaires espacée de 5mm. C'est la partie située entre les deux lignes verticale que je désire retirer de la ligne horizontale Merci par avance pour votre aide Cordialement, celmar |
|
voici ce que je faits:
Sur la ligne à couper: je trace deux intersections sur la ligne à diviser, puis outil diviser/ sélection de la ligne à couper/ accrochage intersection/ sélection/1er point à couper/sélection ligne/2eme point/ sélection de la partie à enlever/échappe/sélection/suprimer |
|
In reply to this post by celmar
intern/extern arrows depends(among others?) on arrow size in Options->Current Drawing Preferences->Dimensions
|
|
This post was updated on .
Ok, Bien vu
Merci perepujal |
|
In reply to this post by celmar
Il y a plus simple à condition de bien respecter la procédure.
La difficulté est dans l'accrochage des points de coupure et des segments à sélectionner. Je continue mon entrainement et je découvre progressivement Pour couper une ligne simple par exemple: Outil "diviser" puis suivre les indication de la ligne de commande mais il n'y a pas de deuxième point à placer alors, échappe, puis sélection sur la partie à enlever et supprimer à noter la modification du curseur lorsque le point de coupure est donné. Comment pratiquez-vous? |
|
This post was updated on .
In reply to this post by celmar
Voici mon premier plan
Je n'ai pas réussi à garder le même format de flèches pour "angles mouchés" et R,30 J'ai trouvé, comme sur l'exercice suivant De plus, l'impression sur une feuille A4 et réduite en 17 x 24 Je suis en apprentissage, pouvez-vous me donner vos commentaires? Je vous en remercie par avance celmar Here is my first plan I did not manage to keep the same format of arrows for "angles mouches" and R,30 I found, as in the following exercise In addition, printing on an A4 sheet and reduced to 17 x 24 I'm learning, can you give me your feedback? Thank you in advance celmar 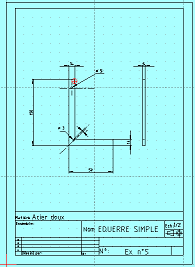 |
|
j'ai modifié mon plan du chasse cône pour les flèches en repère
Merci à monsieur perepujal Vos commentaires seraient les biens venus I modified my plan of the cone hunter for the arrows in mark Thanks to Mr. Perepujal Your comments would be appreciated. 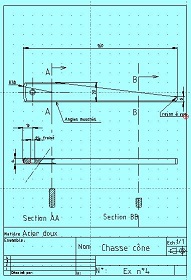 |
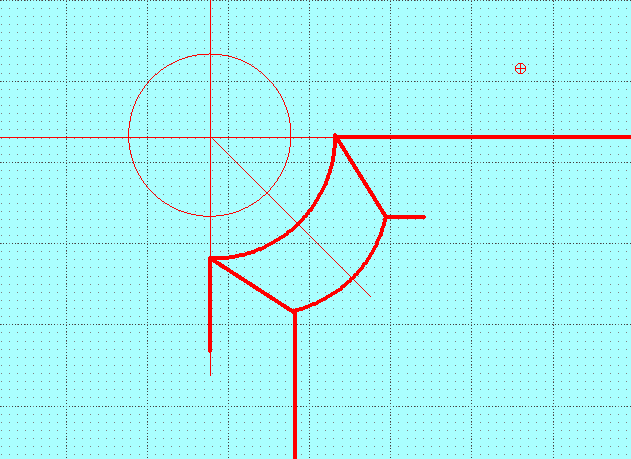 Comme vous pouvez le voir, j'ai réussi à tracer ces rayons en utilisant des cercles complets puis à faire de coupe avec l'outil " ajustement " 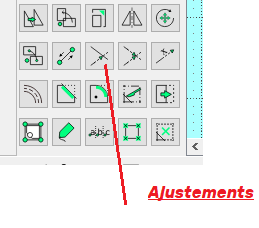 Pourtant, je n'ai pas compris la procédure précise. Il m'a fallu refaire plusieurs tentatives différentes avant de réussir. J'ai eu beaucoup de mal à sélectionner le bon point de coupure et le segment à supprimer. Quelle est la bonne procédure? Merci As you can see I managed to draw these rays using full circles and then do cutting with the 'trim' tool However, I did not understand the precise procedure. I had to make several different attempts before I succeeded. I had a lot of trouble selecting the right cut point and segment to delete. What is the correct procedure? |
|
For this kind of adjustements I prefer the Trim Two function, just at the right of the one you used.
select first the strait lines, then the circles, I get strange behaviour if I select the circles first. Draw 2 concentric circles, then 2 strait lines crossing the circles. Select trim two click on the part of a line that should be kept, then click on the part of the circle that should be kept, continue with the other line and same circle. Do the same with the other circle, voilà |
|
Merci perepuja pour cette réponse
Malgré tout, je n'ai pas réussi à trouver la bonne procédure. Chez moi ça fait n'importe quoi, sans doute à case des tâche de fond, je reprendrai plus tard. Pour l'heure j'ai fini mon plan sans bien savoir ce que j'ai fait avec mes coupures  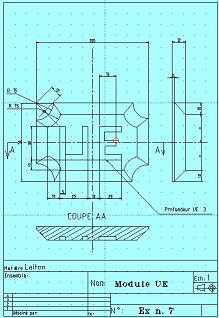 Vos commentaires sont les biens venus Thank you perepuja for this answer However, I couldn't find the right procedure. At home it does anything, probably in case of background tasks, I will resume later. For now I finished my plan without really knowing what I did with my cuts  Your comments are welcome |
|
Finalement, les outils d'ajustement, Trim Two et autres ne me semblent pas très stables chez moi.
J'ai la Version : 2.1.3 Compiler: GNU GCC 4.9.1 Compilé sur : Sep 23 2016 Qt Version: 5.4.1 Boost Version: 1.60.0 System: Windows 10 J'ai changé de méthode et finalement assez rapide Je crée un nouveau plan d' Epure en rouge traits fins avec lequel je trace les rectangles et les cercles Puis avec le Plan des traits forts noirs, je traces les contours définitifs puis avec l'outils "Curce" 3 points, je trace les segments de cercles Ensuite, il suffit de revenir sur le plan d'Epure rouge et de supprimer tout. 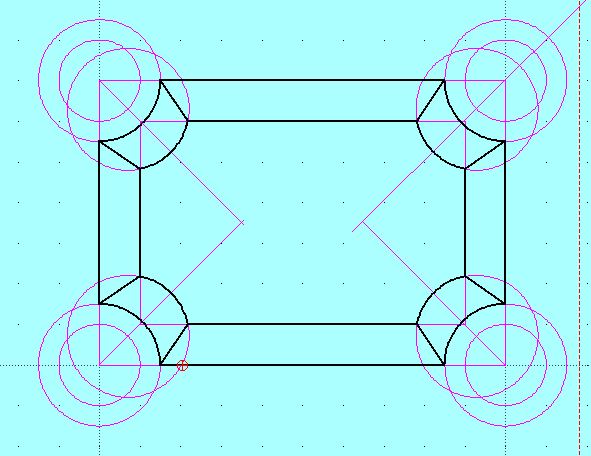 Finally, the adjustment tools, Trim Two and others do not seem very stable to me. I have Version: 2.1.3 I changed the method and finally quite fast I create a new blueprint in red thin lines with which I draw the rectangles and the circles Then with the Plan of strong black lines, I draw the final contours then with the "Curce" 3 points tool, I draw the segments of circles Then just go back to the red Epure blueprint and delete everything. |
|
Petit entrainement pour gagner en rapidité dans l'utilisation des coordonnées relatives.
Little training to gain speed in the use of relative coordinates. 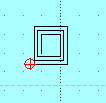 Bon courage |
|
Utilisation des outils :
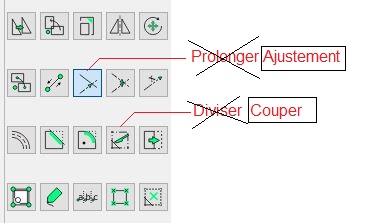 Toujours, en premier choisir l'outil Pour Ajuster une ligne: Outils "Prolonger" que je préfère appeler "Ajustement" Sélectionner l'élément butoir puis l'élément à ajuster. Pour couper un élément ( ligne ou cercle... ) Choisir l′ outil " Diviser " que je préfère appeler "Couper " Clic sur l′ élément à couper Placer le premier point de coupure Clic sur le segment à enlever Placer le deuxième point de coupure Clic à nouveau sur le segment à enlever Clic avec le " le pointeur de sélection " sur le segment à enlever puis, " Supprimer " C'est de cette manière que je procède, mais il y a peut-être mieux à faire? |
|
This post was updated on .
How to copy entities from drawing A to drawing B?
Quite often we need to copy some part of a drawing A and paste it in a drawing B. It is not difficult provided the user knows that both drawings must be opened in the same LibreCAD session. In the example below, each layer has a specified color in order to better visualize what happens. In drawing A, there are 3 layers (layer1, layer2, layer3) showing rectangles and in drawing B there are also 3 layers (layer1, layer2, layer4) showing circles. Each layer has its own color for the sake of clarity. Let us say that we want to copy the green and red rectangles from drawing A to drawing B. The steps are : 1. Launch LibreCAD. 2. Open drawing A. 3. Open drawing B without launching a second time LibreCAD. 4. Go to drawing A window, select the green and red rectangles, click on Copy icon or press CTRL+C and define a reference point. 5. Go to drawing B window, click on Paste icon or press CTRL+V and define a reference point. That's it ! Note that LibreCAD moved the green rectangles of layer 2 in drawing A to the same layer2 in drawing B : so the green rectangles and circles now have the same layer.  Ne fonctionne pas chez moi, Dans aucun mode d'affichage des dessins ( Tab mode, cascade, partage...) Ne fonctionne pas chez moi, Dans aucun mode d'affichage des dessins ( Tab mode, cascade, partage...)
Doesn't work for me, In any drawing display mode (Tab mode, cascade, sharing...) Je viens de télécharger la version Version : 2.2.0-rc2-24-g1d314270 Compilateur : GNU GCC 7.3.0 Compilé le : Nov 23 2021 Version de Qt : 5.12.4 Version de Boost : 1.65.1 Système: Windows 10 (10.0) Les problèmes sont les mêmes I just downloaded the Version version: 2.2.0-rc2-24-g1d314270 Compiler: GNU GCC 7.3.0 Compiled on: Nov 23 2021 Qt version: 5.12.4 Boost Version: 1.65.1 System: Windows 10 (10.0) The problems are the same |
|
This post was updated on .
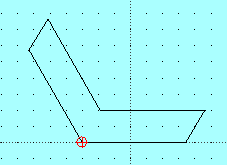
Pour réaliser ce tracé, Quelle est la syntaxe à placer dans la ligne de commande pour indiquer la valeur polaire? J'ai essayé par exemple 20<60° çà ne fonctionne pas. Expression Syntax Error Merci de votre aide To make this plot, what is the syntax to place in the command line to indicate the polar value? I tried for example 20<60° it doesn't work. Expression Syntax Error Thank you for your help |
|
Merci dellus
OK, J'ai ben compris! La largeur de l'équerre est de 20, ce qui donne une longueur d'environ 23,5. Donc il faut calculer. Pour simplifier le tracé, je crois qu'il est préférable de faire l'épure rectangle puis de déformer les rectangle. Je vais essayer. D'en pensez-vous? OK, I got it! The width of the square is 20, which gives a length of approximately 23.5. So you have to calculate. To simplify the drawing, I think it is better to sketch the rectangle then deform the rectangles. I'll try. What do you think? |
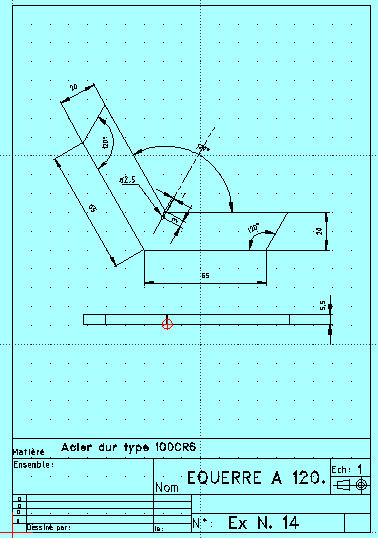 Le plus simple est de faire l'épure avec les lignes horizontales et inclinées puis copier les lignes et les décaler The easiest way is to make the sketch with the horizontal and inclined lines then copy the lines and shift them |
|
How have you found out the length of the inclined lines? Did you really calculate them?
Avoid calculating anything in CAD. It produces inaccuracies leading into trouble. Use geometric construction instead if possible. |
«
Return to LibreCAD-user
|
1 view|%1 views
| Free forum by Nabble | Edit this page |

